Wednesday, 8 August 2012

MATERIALIZED VIEW (Advance Replication)

----SYNTAX

CREATE MATERIALIZED VIEW view-name
BUILD [IMMEDIATE | DEFERRED]
REFRESH [FAST | COMPLETE | FORCE ]
ON [COMMIT | DEMAND ]
[[ENABLE | DISABLE] QUERY REWRITE]
[ON PREBUILT TABLE]
AS

SELECT ...;


Table 1 Refresh Modes
Refresh Mode
Description
ON COMMIT
Refresh occurs automatically when a transaction that modified one of the materialized view's detail tables commits. This can be specified as long as the materialized view is fast refreshable (in other words, not complex). The ON COMMIT privilege is necessary to use this mode
ON DEMAND
Refresh occurs when a user manually executes one of the available refresh procedures contained in the DBMS_MVIEW package (REFRESHREFRESH_ALL_MVIEWSREFRESH_DEPENDENT)


Table 2 Refresh Options

Refresh Option
Description
COMPLETE
Refreshes by recalculating the materialized view's defining query.
FAST
Applies incremental changes to refresh the materialized view using the information logged in the materialized view logs, or from a SQL*Loader direct-path or a partition maintenance operation.
FORCE
Applies FAST refresh if possible; otherwise, it applies COMPLETE refresh.
NEVER
Indicates that the materialized view will not be refreshed with refresh mechanisms.

For Complete Refresh, the refresh duration will be in the FULLREFRESHTIM column of the DBA_MVIEW_ANALYSIS. For Fast Refresh duration, it will be in the INCREFRESHTIM column.
Both values are in seconds.

SELECT mview_name, last_refresh_date, fullrefreshtim, increfreshtim
FROM dba_mview_analysis

WHERE owner='SCOTT';


-----Parameter
optimizer_mode = choose, first_rows, or all_rows
job_queue_interval = 3600
job_queue_processes = 1
query_rewrite_enabled = true
query_rewrite_integrity = enforced


# Referesh
exec dbms_mview.refresh('abc_mv'); //Mannual complete refresh
EXECUTE DBMS_MVIEW.REFRESH('emp_dept_sum','F'); //Mannual fast (incremental) refresh (F denotes Fast)
Execute DBMS_MVIEW.REFRESH_DEPENDENT // Refreshes all table-based Oracle materialized views.

-----Test Demontration Non wirtable

create table abc as select * from scott.dept;
create table abc_prim as select * from scott.dept;
alter table abc_prim add constraint PK_abc_PRIM primary key (DEPTNO);

-create materialized view abc_mv as select * from abc; //Error because create materialize view to need base table one primary Key.
-create materialized view abc_mv as select * from abc_prim; //ONLY View not a writable


SQL> insert into dept_mv values(50,'TESTING','MUNICH'); insert into dept_mv values(50,'TESTING','MUNICH')
*
ERROR at line 1:
ORA-01732: data manipulation operation not legal on this view

drop materialized view abc_mv;


--------Test Demontration Updateable MVIEW (Not Refresh Perform DML)
Advantages:
Can be updated even when disconnected from the master site or master materialized view site.
Requires fewer resources than multimaster replication.
Are refreshed on demand. Hence the load on the network might be reduced compared to using multimaster replication because multimaster replication synchronises changes at regular intervalls.

create table abc_prim as select * from scott.dept;
alter table abc_prim add constraint PK_abc_PRIM primary key (DEPTNO);
create materialized view abc_mv FOR UPDATE as select * from abc_prim;
select * from abc_prim;
select * from abc_mv;
insert into abc_mv values(50,'TESTING','MUNICH');
select * from abc_prim;
select * from abc_mv;
select * from abc_prim


drop table abc_prim;
insert into abc_mv values(50,'TESTING','MUNICH');
select * from abc_prim;
select * from abc_mv;

drop materialized view abc_mv;


----Automatic fast refresh of materialized views (ON COMMIT REFERESH) (with refresh view log)
1.
create table abc_prim as select * from scott.dept;
alter table abc_prim add constraint PK_abc_PRIM primary key (DEPTNO);
create materialized view log on abc_prim;
create materialized view abc_mv REFRESH FAST ON COMMIT DISABLE QUERY REWRITE
as select * from scott.abc_prim;

select * from abc_prim;
select * from abc_mv;
select * from MLOG$_abc_prim;

insert into abc_prim values(50,'TEST','MUNICH');


select * from abc_prim;
select * from abc_mv;
select * from MLOG$_abc_prim;

commit;

select * from abc_prim;
select * from abc_mv;
select * from MLOG$_abc_prim;


2.
CREATE MATERIALIZED VIEW abc_mv1
ENABLE QUERY REWRITE
AS SELECT *
FROM abc_prim
GROUP BY deptno
PCTFREE 5
PCTUSED 60
NOLOGGING PARALLEL 5
TABLESPACE users
STORAGE (INITIAL 50K NEXT 50K)
USING INDEX STORAGE (INITIAL 25K NEXT 25K)
REFRESH FAST
START WITH SYSDATE
NEXT SYSDATE + 1/12;


# Purge MV log
-select * from MLOG$_abc_prim;
-insert into abc_prim values(50,'TEST','MUNICH');
-select * from MLOG$_abc_prim;
-execute DBMS_MVIEW.PURGE_LOG( master => 'T', num => 9999, flag => 'delete' ) ;
-select * from MLOG$_abc_prim;


----------REFRESH GROUPS - CLUBBING RELATED VIEWS

Metalink: http://www.databasejournal.com/features/oracle/article.php/10893_2200191_2/Manually-Refreshing-Materialized-Views-and-Creating-Refresh-Groups-in-Oracle.htm

Metalink: http://www.sqlsnippets.com/en/topic-12880.html


MAKE Make a Refresh Group
ADD Add materialized view to the refresh group
SUBTRACT Remove materialized view from the refresh group
REFRESH Manually refresh the group
CHANGE Change refresh interval of the refresh group
DESTROY Remove all materialized views from the refresh group and delete the refresh group

DBMS_REFRESH - Procedure MAKE

The MAKE procedure is used to create a new Refresh group.

We will make a refresh group my_group_1:
SQL> execute DBMS_REFRESH.MAKE(
name => 'my_group_1',
list => ' mv_market_rate, mv_dealer_rate',
next_date => sysdate,
interval => 'sysdate+1/48');

my_group_1 has two views in its group, mv_market_rate and mv_dealer_rate. Both of these views will be refreshed at an interval of 30 minutes
DBMS_REFRESH - Procedure ADD

Add a snapshot/materialized view to the already existing refresh group:
SQL> execute DBMS_REFRESH.ADD(
name => 'my_group_1',
list => 'mv_borrowing_rate');


------Monitoring materialized views
select
substr(job,1,4) "Job", substr(log_user,1,5) "user",
substr(schema_user,1,5) "schema",
substr(to_char(last_date,'DD-MM-YYYY HH24:MI'),1,16) "last_date",
substr(to_char(next_date,'DD-MM-YYYY HH24:MI'),1,16) "next_date",
substr(broken,1,2) "B" ,substr(failures,1,6) "failed",
substr(what,1,20) "command"
From dba_jobs;


-------Refresh Materialized Views

If a materialized view is configured to refresh on commit, you should never need to manually refresh it, unless a rebuild is necessary. Remember, refreshing on commit is a very intensive operation for volatile base tables. It makes sense to use fast refreshes where possible.
For on demand refreshes, you can choose to manually refresh the materialized view or refresh it as part of a refresh group.

The following code creates a refresh group defined to refresh every minute and assigns a materialized view to it.

BEGIN
   DBMS_REFRESH.make(
     name                 => 'SCOTT.MINUTE_REFRESH',
     list                 => '',
     next_date            => SYSDATE,
     interval             => '/*1:Mins*/ SYSDATE + 1/(60*24)',
     implicit_destroy     => FALSE,
     lax                  => FALSE,
     job                  => 0,
     rollback_seg         => NULL,
     push_deferred_rpc    => TRUE,
     refresh_after_errors => TRUE,
     purge_option         => NULL,
     parallelism          => NULL,
     heap_size            => NULL);
END;
/

BEGIN
   DBMS_REFRESH.add(
     name => 'SCOTT.MINUTE_REFRESH',
     list => 'SCOTT.EMP_MV',
     lax  => TRUE);
END;
/

A materialized view can be manually refreshed using the DBMS_MVIEW package.

EXEC DBMS_MVIEW.refresh('EMP_MV');


Rather than using a refresh group, you can schedule DBMS_MVIEW.REFRESH called using the ORACLE SCHEDULER

Monday, 6 August 2012

Backup Samba Server with Datewise directory

This summary is not available. Please click here to view the post.

BACKUP CRON JOB


RMAN> show all;

RMAN configuration parameters for database with db_unique_name xxxxx are:
CONFIGURE RETENTION POLICY TO RECOVERY WINDOW OF 15 DAYS;
CONFIGURE BACKUP OPTIMIZATION OFF;
CONFIGURE DEFAULT DEVICE TYPE TO DISK;
CONFIGURE CONTROLFILE AUTOBACKUP ON;
CONFIGURE CONTROLFILE AUTOBACKUP FORMAT FOR DEVICE TYPE DISK TO '+FRA/bsquat/autobackup/%F';
----OR-----
CONFIGURE CONTROLFILE AUTOBACKUP FORMAT FOR DEVICE TYPE DISK TO '/mnt/OracleBackup/BSQUAT/RmanOnline/%F';
CONFIGURE DEVICE TYPE DISK PARALLELISM 1 BACKUP TYPE TO COMPRESSED BACKUPSET;
CONFIGURE DATAFILE BACKUP COPIES FOR DEVICE TYPE DISK TO 1;
CONFIGURE ARCHIVELOG BACKUP COPIES FOR DEVICE TYPE DISK TO 1;
CONFIGURE CHANNEL 1 DEVICE TYPE DISK CONNECT '*';
CONFIGURE MAXSETSIZE TO UNLIMITED;
CONFIGURE ENCRYPTION FOR DATABASE OFF;
CONFIGURE ENCRYPTION ALGORITHM 'AES128';
CONFIGURE COMPRESSION ALGORITHM 'BASIC' AS OF RELEASE 'DEFAULT' OPTIMIZE FOR LOAD TRUE;
CONFIGURE ARCHIVELOG DELETION POLICY TO BACKED UP 1 TIMES TO DISK;
CONFIGURE SNAPSHOT CONTROLFILE NAME TO '/u01/app/oracle/product/11.2.0/dbhome_1/dbs/snapcf_bsquat1.f';

------------------------------------------------ Limit Backup Piece size --------------------

RMAN> CONFIGURE CHANNEL 1 DEVICE TYPE DISK CONNECT 'sys/xxxx@target' MAXPIECESIZE = 500M;

----Optional to default auto backup location of Controlfile Configuration .---

RMAN> backup current controlfile format '/mnt/OracleBackup/BSQUAT/RmanOnline/FRA_%d_%T_%U.ctl';
RMAN> backup as backupset spfile format '/mnt/OracleBackup/BSQUAT/RmanOnline/FRA_%d_%T_%U.spfile';

Single Instance RMAN Configuration :

RMAN> show all;

using target database control file instead of recovery catalog

RMAN configuration parameters for database with db_unique_name VOLDEV are:

CONFIGURE RETENTION POLICY TO RECOVERY WINDOW OF 15 DAYS;
CONFIGURE BACKUP OPTIMIZATION OFF;
CONFIGURE DEFAULT DEVICE TYPE TO DISK;
CONFIGURE CONTROLFILE AUTOBACKUP ON;
CONFIGURE CONTROLFILE AUTOBACKUP FORMAT FOR DEVICE TYPE DISK TO '/mnt/OracleBackup/voldev/RmanOnline/%F';
CONFIGURE DEVICE TYPE DISK PARALLELISM 1 BACKUP TYPE TO COMPRESSED BACKUPSET;
CONFIGURE DATAFILE BACKUP COPIES FOR DEVICE TYPE DISK TO 1;
CONFIGURE ARCHIVELOG BACKUP COPIES FOR DEVICE TYPE DISK TO 1;
CONFIGURE CHANNEL 1 DEVICE TYPE DISK FORMAT '/mnt/OracleBackup/voldev/RmanOnline/%d_%D%M%Y_s%s_p%p';
CONFIGURE MAXSETSIZE TO UNLIMITED;
CONFIGURE ENCRYPTION FOR DATABASE OFF;
CONFIGURE ENCRYPTION ALGORITHM 'AES128';
CONFIGURE COMPRESSION ALGORITHM 'BASIC' AS OF RELEASE 'DEFAULT' OPTIMIZE FOR LOAD TRUE;
CONFIGURE ARCHIVELOG DELETION POLICY TO BACKED UP 1 TIMES TO DISK;
CONFIGURE SNAPSHOT CONTROLFILE NAME TO '/u01/app/oracle/product/11.2.0/dbhome_1/dbs/snapcf_voldev.f';

RMAN CRON JOB:

[oracle@vol-oracledev ~]$ crontab -l

00 22 * * 5 /fra/backupScript/backupFRIDAY.sh >> /fra/backupScript/backupFRIDAY.log 2>&1

00 22 * * 1-4 /fra/backupScript/backupMON2THU.sh >> /fra/backupScript/backupMON2THU.log 2>&1


----Script 1
backupFRIDAY.sh

#!/bin/bash
export DATE=$(date +%Y-%m-%d__%A_%H@%M@%S)
export ORACLE_HOME=/u01/app/oracle/product/11.2.0/dbhome_1
export ORACLE_SID=voldev
export PATH=$PATH:$ORACLE_HOME/bin
#export NLS_DATE_FORMAT=.DD-MON-YY HH24:MI:SS.
rman catalog rman/xxxx@voldev target sys/xxxxx@voldev msglog /fra/flash_recovery_area/VOLDEV/onlinelog/logs/rman_INCR_0_bk__voldev_${DATE}.log <<EOF

RUN

{
backup incremental level 0 device type disk tag '%TAG' database;
backup device type disk tag '%TAG' archivelog all not backed up;
crosscheck backup;
delete noprompt expired backup;
delete noprompt obsolete device type disk;
crosscheck archivelog all;
delete noprompt expired archivelog all;
}

EXIT;

EOF


-----Script 2
backupMON2THU.sh

#!/bin/bash
export DATE=$(date +%Y-%m-%d__%A_%H@%M@%S)
export ORACLE_HOME=/u01/app/oracle/product/11.2.0/dbhome_1
export ORACLE_SID=voldev
export PATH=$PATH:$ORACLE_HOME/bin
#export NLS_DATE_FORMAT=.DD-MON-YY HH24:MI:SS.
rman catalog rman/xxxx@voldev target sys/xxxxx@voldev msglog /fra/flash_recovery_area/VOLDEV/onlinelog/logs/rman_INCR_1_bk__voldev_${DATE}.log <<EOF

RUN

{
backup incremental level 1 device type disk tag '%TAG' database;
backup device type disk tag '%TAG' archivelog all not backed up;
}

EXIT;

EOF

Wednesday, 1 August 2012

ORA-02185: a token other than WORK follows COMMIT

Problem Generate:-
abc.txt
update table xxx set sal=sal+100 where empid=1;
update table xxx set sal=sal+100 where empid=2;
update table xxx set sal=sal+100 where empid=3;
commit;
update table xxx set sal=sal+100 where empid=4;
update table xxx set sal=sal+100 where empid=5;
update table xxx set sal=sal+100 where empid=6;
commit
update table xxx set sal=sal+100 where empid=7;
update table xxx set sal=sal+100 where empid=8;
commit;

spool '/u01/log.log' 
@ abc.txt
spool off

check log.log file & see the error


1 row updated

update table xxx set sal=sal+100 where empid=7;
*
ERROR at line 2:
ORA-02185: a token other than WORK follows COMMIT


Solution:- 
check your code and see if you add (:) colon instead of ( ; ) semicolon after the COMMIT in your code.


Tuesday, 31 July 2012

TYPE OF SEGMENTS IN ORACLE


Data blocks are used by Oracle in all I/O operations. A segment is composed of one or more extents, but all the data in a table or an index must be contained within a single segment.
Database objects, such as tables and indexes, are held in specific segments. You do not specifically create segments--they are automatically created to support different types of storage.
Types of segments
There are four types of segments used by Oracle:

Data segment: A data segment is created each time you create a table. The number and size of extents
                          for a data segment is specified in the CREATE TABLE statement.

 Index segment: An index segment is created each time you create an index. The number and size of              
                            extents for an index segment is specified in the CREATE INDEX statement.  (Ques.Use index)

 Temporary segment: A temporary segment may be necessary to provide temporary storage for database
                                    operations, such as sorting. Temporary segments are allocated for the temporary
                                    tablespace of users who require the additional space for temporary storage.

 Rollback segment: A rollback segment contains information needed by your Oracle database to roll back
                                  transactions, if necessary. Rollback segments are allocated to the database and cannot
                                  be directly accessed by users or database administrators.

Linux Partion Steps


1.df -h
2.fdisk -l     //CHECK THE SPACE
3.fdisk /dev/sda //CHECK THE HD SPACE
4.p check the partion, n new partion ,d for delete partion & enter partion number,m for help
5.e extended partion ,p primary partion 3,logical many partion.
6.p check the partion.
7.w write to disk & exit
8.partprobe /dev/sda
9.mkfs -t ext3 /dev/sda8
10.mkdir /u03
11. cd /
12. ll
13.mount /dev/sda8 /u03
14.df -h
15.vim /etc/fstab   //add /u03 entry in this file
/dev/sda8              /u03                    ext3    defaults        0 0

16.df -h
17.partprobe /dev/sda
18.mount -a


RHEL / CentOS Support 4GB or more RAM ( memory )


If you have 4 GB or more RAM use the Linux kernel compiled for PAE capable machines. Your machine may not show up total 4GB ram. All you have to do is install PAE kernel package.

This package includes a version of the Linux kernel with support for up to 64GB of high memory. It requires a CPU with Physical Address Extensions (PAE).
 The non-PAE kernel can only address up to 4GB of memory. Install the kernel-PAE package if your machine has more than 4GB of memory (>=4GB).
How Do I Install PAE kernel?

To install PAE kernel, use yum command:
# yum install kernel-PAE

 Output:
Loading "installonlyn" plugin
Setting up Install Process
Setting up repositories
Reading repository metadata in from local files
Parsing package install arguments
Resolving Dependencies
--> Populating transaction set with selected packages. Please wait.
---> Downloading header for kernel-PAE to pack into transaction set.
kernel-PAE-2.6.18-8.1.15. 100% |=========================| 207 kB    00:00
---> Package kernel-PAE.i686 0:2.6.18-8.1.15.el5 set to be installed
--> Running transaction check
Dependencies Resolved
=============================================================================
 Package                 Arch       Version          Repository        Size
=============================================================================
Installing:
 kernel-PAE              i686       2.6.18-8.1.15.el5  updates            12 M
Transaction Summary
=============================================================================
Install      1 Package(s)
Update       0 Package(s)
Remove       0 Package(s)
Total download size: 12 M
Is this ok [y/N]: y
Downloading Packages:
(1/1): kernel-PAE-2.6.18- 100% |=========================|  12 MB    00:12
Running Transaction Test
Finished Transaction Test
Transaction Test Succeeded
Running Transaction
  Installing: kernel-PAE                   ######################### [1/1]
Installed: kernel-PAE.i686 0:2.6.18-8.1.15.el5
Complete!

Just reboot the server and make sure you boot with PAE kernel i.e. 2.6.18-8.1.15.el5PAE:
# reboot

MULTIPLE DBWn PARAMETERE DEFINE BECAUSE FREE BUFFER WAITS IN (DB BUFFER CACHE)

This means we are waiting for a free buffer but there are none available in the cache because there are too many dirty buffers in the cache. Causes :

1. Buffer cache is too small

Solutn: - Use AMM/ASMM
- Increase Db buffer cache size as per
- ADDM recommendation
- v$db_cache_advice

2. DBWR is slow in writing modified buffers to disk and is unable to keep up to the write requests.
Solutn: - Increase I/O bandwidth by striping the datafiles.
- If asynchronous I/O is supported .
--Enable asynchronous I/O (DISK_ASYNCH_IO=true)
---- if multiple CPU's are there,
      Increase the no. of database writers (DB_WRITER_PROCESSES)
           else
      Configure I/O slaves (set DBWR_IO_SLAVES to non zero )
else
Configure I/O slaves (set DBWR_IO_SLAVES to non zero )

3. Large sorts and full table scans are filling the cache with modified blocks faster than the DBWR is able to write to disk.
Solutn: - Pre-sorting or reorganizing data can help

=======================================================================

WHEN THE SGA SIZE IS MORE CONSUME AND AT A TIME ONE DBWn PROCESS ,ALL BUFFER CACHE DATA IS
WRITE ON DATAFILE BUT IN CASE YOU WILL EXECUTE SOME QUERIES BUT PROCESS IS NOT ALLOCATED
THE SPACE ON BUFFER CACHE ,SO MULTIPLE DBWn IS WORK FAST TWO OR MORE PROCESS IS WRITE A DATA
ON DATAFILE PARALLELY AND PROCESS ALLOCATE A SPACE ON BUFFER CACHE.

PARAMETER IS DEFINE ON THIS FILE:-
( Oracle I_O Slave Waits dbwr parallel DML   )

SHOW PARAMETER DB_WRITER_%

SHOW PARAMETER DBWR_IO_SLAVES

Parameter type Integer

Default value 0

Parameter class Static

Range of values 0 to operating system-dependent


DBWR_IO_SLAVES is relevant only on systems with only one database writer process (DBW0). It specifies the number of I/O server processes used by the DBW0 process. The DBW0 process and its server processes always write to disk. By default, the value is 0 and I/O server processes are not used.

If you set DBWR_IO_SLAVES to a nonzero value, the number of I/O server processes used by the ARCH and LGWR processes is set to 4. However, the number of I/O server processes used by Recovery Manager is set to 4 only if asynchronous I/O is disabled (either your platform does not support asynchronous I/O or disk_asynch_io is set to false.

Typically, I/O server processes are used to simulate asynchronous I/O on platforms that do not support asynchronous I/O or that implement it inefficiently. However, you can use I/O server processes even when asynchronous I/O is being used. In that case the I/O server processes will use asynchronous I/O.

I/O server processes are also useful in database environments with very large I/O throughput, even if asynchronous I/O is enabled.

NOTE:-
======
IT MEANS THE  "DBWR_IO_SLAVES"  INITIAL 2 OR 3 PROCESS ARE EXCUTES PARALLELY
IF THE  "DBWR_IO_SLAVES"  NOT INITIALIZED THE PROCESS ARE EXECUTED IN A QUEUE
IN THIS WORK ON  "DB_WRITER_PROCESS"  PARAMETER INITIAL FIRST .

TABLESPACE TRANSPORTATION FROM DATABASE VINAY TO ORCL1


[oracle@localhost ~]$ export ORACLE_SID=vinay
[oracle@localhost ~]$ sqlplus '/ as sysdba'

SQL*Plus: Release 10.2.0.1.0 - Production on Fri Sep 24 12:37:22 2010

Copyright (c) 1982, 2005, Oracle.  All rights reserved.


Connected to:
Oracle Database 10g Enterprise Edition Release 10.2.0.1.0 - Production
With the Partitioning, OLAP and Data Mining options

SQL> select name from v$database;

NAME
---------
vinay

SQL> select status from v$instance;

STATUS
------------
OPEN


12:25:33 SQL> select username,default_tablespace from dba_users;

--make sure sid will tablespace name and sid.dbf file will be the same name of tablespace then tablespace can be created only...

12:26:02 SQL> create tablespace sid datafile '/u01/app/oracle/oradata/vinay/sid1.dbf' size 10m;
Tablespace created.

12:27:57 SQL> create user tts_user identified by tts default tablespace sid;
User created.

--now we will check this user has been created in the same tablespace which we have just created..

12:28:32 SQL> select username,default_tablespace from dba_users;

USERNAME                       DEFAULT_TABLESPACE
------------------------------ ------------------------------
MGMT_VIEW                      SYSTEM
SYS                            SYSTEM
SYSTEM                         SYSTEM
DBSNMP                         SYSAUX
SYSMAN                         SYSAUX
HR                             USERS
TTS_USER                       SID
OUTLN                          SYSTEM
MDSYS                          SYSAUX
ORDSYS                         SYSAUX
EXFSYS                         SYSAUX

--Now we will check our created tablespace is online or offline of readonly so that....????

12:29:50 SQL> select tablespace_name,status from dba_tablespaces;

TABLESPACE_NAME                STATUS
------------------------------ ---------
SYSTEM                         ONLINE
UNDOTBS1                       ONLINE
SYSAUX                         ONLINE
TEMP                           ONLINE
USERS                          ONLINE
EXAMPLE                        ONLINE
TBSALERT                       ONLINE
TTS                            READ ONLY
SID                            ONLINE

9 rows selected.


--after checking it online we will make it Read Only Istead of online...

12:30:17 SQL> alter tablespace sid read only;
Tablespace altered.

12:30:33 SQL> exec dbms_tts.transport_set_check('SID');

PL/SQL procedure successfully completed.

--THIS THE PACKAGE WE ARE RUNNING HERE TO verify is it able to transport or not(package)...IF IT IS SUCCESSFULLY COMPLETED THEN WE CAN MOVE TO ANY DATABASE...WE WILL ALSO CHECK THROUGH THIS STATMENT TO CHECK THE VOILATIONS IF ANY IT WILL SHOW OR IT WILL SAY NO ROWS SELECTED MEANS WE CAN GO AHEAD SUSSESSFULLY...


12:31:03 SQL> select * from transport_set_violations;

no rows selected

--it will check is there any object created by sys in current tablespace or not if yes then it wont allow..


12:31:20 SQL> host pwd
/home/oracle

12:31:29 SQL> host exp file=sid.dmp transport_tablespace=Y tablespaces=sid

Export: Release 10.2.0.1.0 - Production on Fri Sep 24 12:32:01 2010

Copyright (c) 1982, 2005, Oracle.  All rights reserved.


Username: / as sysdba

Connected to: Oracle Database 10g Enterprise Edition Release 10.2.0.1.0 - Production
With the Partitioning, OLAP and Data Mining options
Export done in US7ASCII character set and AL16UTF16 NCHAR character set
server uses WE8ISO8859P1 character set (possible charset conversion)
Note: table data (rows) will not be exported
About to export transportable tablespace metadata...
For tablespace SID ...
. exporting cluster definitions
. exporting table definitions
. exporting referential integrity constraints
. exporting triggers
. end transportable tablespace metadata export
Export terminated successfully without warnings.

12:32:18 SQL> alter tablespace sid online;

Tablespace altered.

12:32:54 SQL>


[oracle@localhost ~]$ export ORACLE_SID=orcl1
[oracle@localhost ~]$ sqlplus '/ as sydba'

SQL*Plus: Release 10.2.0.1.0 - Production on Fri Sep 24 12:37:15 2010

Copyright (c) 1982, 2005, Oracle.  All rights reserved.


SQL*Plus: Release 10.2.0.1.0 - Production

Copyright (c) 1982, 2005, Oracle.  All rights reserved.
 [oracle@localhost ~]$ sqlplus '/ as sysdba'

SQL*Plus: Release 10.2.0.1.0 - Production on Fri Sep 24 12:37:22 2010

Copyright (c) 1982, 2005, Oracle.  All rights reserved.


Connected to:
Oracle Database 10g Enterprise Edition Release 10.2.0.1.0 - Production
With the Partitioning, OLAP and Data Mining options

--THIS IS VERY IMPORTANT STEP TO COPY THE sid1.dbf FILE FROM FIRST DATABSE & PAST IT INTO SECOND DATABASE...
--now go to oradata folder n from first database copy the first datafile sid1.dbf and past into second database .

SQL> select name from v$database;

NAME
---------
ORCL1

SQL> select status from v$instance;

STATUS
------------
OPEN

SQL> create user tts_user identified by tts_user;   --Here we will create same user which has been created in first db.

User created.

SQL> grant connect,resource to tts_user;

Grant succeeded.


SQL>  select tablespace_name from dba_tablespaces;

TABLESPACE_NAME
------------------------------
SYSTEM
UNDOTBS1
SYSAUX
TEMP
USERS
EXAMPLE

6 rows selected.

--we confirmed it no such table space availabe which we created above in current databse...


--Now we r going to import the datafile & tablespace so make sure here we will give orcl1 which is current database....

SQL> host imp file=sid.dmp transport_tablespace=Y tablespaces=sid datafiles='/u01/app/oracle/oradata/orcl1/sid1.dbf'

Import: Release 10.2.0.1.0 - Production on Fri Sep 24 12:42:03 2010

Copyright (c) 1982, 2005, Oracle.  All rights reserved.

Username: / as sysdba

Connected to: Oracle Database 10g Enterprise Edition Release 10.2.0.1.0 - Production
With the Partitioning, OLAP and Data Mining options

Export file created by EXPORT:V10.02.01 via conventional vinay
About to import transportable tablespace(s) metadata...
import done in US7ASCII character set and AL16UTF16 NCHAR character set
import server uses WE8ISO8859P1 character set (possible charset conversion)
. importing SYS's objects into SYS
Import terminated successfully without warnings.

SQL> select tablespace_name,status from dba_tablespaces;

TABLESPACE_NAME                STATUS
------------------------------ ---------
SYSTEM                         ONLINE
UNDOTBS1                       ONLINE
SYSAUX                         ONLINE
TEMP                           ONLINE
USERS                          ONLINE
EXAMPLE                        ONLINE
SID                            READ ONLY

7 rows selected.

SQL> alter tablespace sid read write;

Tablespace altered.


SQL> conn tts_user/tts_user
Connected.
-----------------------------one more time practice detials given below date was-5-feb-2011-------------

[oracle@localhost ~]$ export ORACLE_SID=orcl2
[oracle@localhost ~]$ sqlplus '/as sysdba'

SQL*Plus: Release 10.2.0.1.0 - Production on Sat Feb 5 19:10:33 2011

Copyright (c) 1982, 2005, Oracle.  All rights reserved.


Connected to:
Oracle Database 10g Enterprise Edition Release 10.2.0.1.0 - Production
With the Partitioning, OLAP and Data Mining options

SQL> conn hr/hr
Connected.
SQL> conn as sysdba
Enter user-name: sys
Enter password:
Connected.
SQL> show user
USER is "SYS"
SQL> select name from v$database;

NAME
---------
ORCL2

SQL> select status from v$instance;

STATUS
------------
OPEN

SQL> select username,default_tablespace from dba_users;

USERNAME                       DEFAULT_TABLESPACE
------------------------------ ------------------------------
MDSYS                          SYSAUX
ORDSYS                         SYSAUX
EXFSYS                         SYSAUX
DMSYS                          SYSAUX
DBSNMP                         SYSAUX
SCOTT                          USERS
WMSYS                          SYSAUX
TSMSYS                         USERS
BI                             USERS
PM                             USERS
MDDATA                         USERS

USERNAME                       DEFAULT_TABLESPACE
------------------------------ ------------------------------
IX                             USERS
CTXSYS                         SYSAUX
ANONYMOUS                      SYSAUX
SH                             USERS
OUTLN                          SYSTEM
DIP                            USERS
OE                             USERS
HR                             USERS
SYSMAN                         SYSAUX
XDB                            SYSAUX
ORDPLUGINS                     SYSAUX

USERNAME                       DEFAULT_TABLESPACE
------------------------------ ------------------------------
MGMT_VIEW                      SYSTEM
SI_INFORMTN_SCHEMA             SYSAUX
OLAPSYS                        SYSAUX
SYS                            SYSTEM
SYSTEM                         SYSTEM

27 rows selected.

SQL> Create TableSpace Saba datafile '/u01/app/oracle/oradata/orcl2/saba1.dbf' size 10m;

Tablespace created.

SQL> create user sabau identified by salim default tablespace saba;

User created.

SQL> select username,default_tablespace from dba_users;

USERNAME                       DEFAULT_TABLESPACE
------------------------------ ------------------------------
MDSYS                          SYSAUX
ORDSYS                         SYSAUX
EXFSYS                         SYSAUX
DMSYS                          SYSAUX
DBSNMP                         SYSAUX
SCOTT                          USERS
WMSYS                          SYSAUX
TSMSYS                         USERS
SABAU                          SABA
BI                             USERS
PM                             USERS

USERNAME                       DEFAULT_TABLESPACE
------------------------------ ------------------------------
MDDATA                         USERS
IX                             USERS
CTXSYS                         SYSAUX
ANONYMOUS                      SYSAUX
SH                             USERS
OUTLN                          SYSTEM
DIP                            USERS
OE                             USERS
HR                             USERS
SYSMAN                         SYSAUX
XDB                            SYSAUX

USERNAME                       DEFAULT_TABLESPACE
------------------------------ ------------------------------
ORDPLUGINS                     SYSAUX
MGMT_VIEW                      SYSTEM
SI_INFORMTN_SCHEMA             SYSAUX
OLAPSYS                        SYSAUX
SYS                            SYSTEM
SYSTEM                         SYSTEM

28 rows selected.

SQL> host emctl start dbconsole
TZ set to Asia/Calcutta
Oracle Enterprise Manager 10g Database Control Release 10.2.0.1.0
Copyright (c) 1996, 2005 Oracle Corporation.  All rights reserved.
http://localhost.localdomain:5500/em/console/aboutApplication
 - An instance of Oracle Enterprise Manager 10g Database Control is already running.

SQL> alter tablespace saba read only;

Tablespace altered.

SQL> exe dbms_tts.transport_set_check('saba');
SP2-0734: unknown command beginning "exe dbms_t..." - rest of line ignored.
SQL> exec dbms_tts.transport_set_check('saba');

PL/SQL procedure successfully completed.

SQL> select *from transport_set_violations;

no rows selected

SQL> host pwd
/home/oracle

SQL> host exp file=saba.dmp transport_tabaspace=Y tablespaces=saba;
LRM-00101: unknown parameter name 'transport_tabaspace'

EXP-00019: failed to process parameters, type 'EXP HELP=Y' for help
EXP-00000: Export terminated unsuccessfully

SQL> host exp file=saba.dmp transport_tablespace=Y tablespaces=saba;

Export: Release 10.2.0.1.0 - Production on Sat Feb 5 19:29:08 2011

Copyright (c) 1982, 2005, Oracle.  All rights reserved.


Username: / as sysdba

Connected to: Oracle Database 10g Enterprise Edition Release 10.2.0.1.0 - Production
With the Partitioning, OLAP and Data Mining options
Export done in US7ASCII character set and AL16UTF16 NCHAR character set
server uses WE8ISO8859P1 character set (possible charset conversion)
Note: table data (rows) will not be exported
About to export transportable tablespace metadata...
For tablespace SABA ...
. exporting cluster definitions
. exporting table definitions
. exporting referential integrity constraints
. exporting triggers
. end transportable tablespace metadata export
Export terminated successfully without warnings.

SQL> alter tablespace saba online;

Tablespace altered.

SQL> exit
Disconnected from Oracle Database 10g Enterprise Edition Release 10.2.0.1.0 - Production
With the Partitioning, OLAP and Data Mining options
[oracle@localhost ~]$ export ORACLE_SID=orcl1
[oracle@localhost ~]$ sqlplus '/as sysdba'

SQL*Plus: Release 10.2.0.1.0 - Production on Sat Feb 5 19:32:58 2011

Copyright (c) 1982, 2005, Oracle.  All rights reserved.


Connected to:
Oracle Database 10g Enterprise Edition Release 10.2.0.1.0 - Production
With the Partitioning, OLAP and Data Mining options

SQL> select name from v$database;

NAME
---------
ORCL1

SQL> select status from v$instance;

STATUS
------------
OPEN

SQL> create user sabau identified by salim;

User created.

SQL> Grant connect,resource to sabau;

Grant succeeded.

SQL> select tablespace_name from dba_tablespaces;

TABLESPACE_NAME
------------------------------
SYSTEM
UNDOTBS1
SYSAUX
TEMP
USERS
EXAMPLE
SAMDBA

7 rows selected.

SQL> host imp file=saba.dmp transport_tablespace=Y tablespaces=saba datafiles='/u01/app/oracle/oradata/orcl1/saba1.dbf';

Import: Release 10.2.0.1.0 - Production on Sat Feb 5 19:52:28 2011

Copyright (c) 1982, 2005, Oracle.  All rights reserved.

Username: / as sysdba

Connected to: Oracle Database 10g Enterprise Edition Release 10.2.0.1.0 - Production
With the Partitioning, OLAP and Data Mining options

Export file created by EXPORT:V10.02.01 via conventional vinay
About to import transportable tablespace(s) metadata...
import done in US7ASCII character set and AL16UTF16 NCHAR character set
import server uses WE8ISO8859P1 character set (possible charset conversion)
. importing SYS's objects into SYS
Import terminated successfully without warnings.

SQL> select tablespace_name , status from dba_tablespaces;

TABLESPACE_NAME                STATUS
------------------------------ ---------
SYSTEM                         ONLINE
UNDOTBS1                       ONLINE
SYSAUX                         ONLINE
TEMP                           ONLINE
USERS                          ONLINE
EXAMPLE                        ONLINE
SAMDBA                         ONLINE
SABA                           READ ONLY

8 rows selected.

SQL> alter tablespace saba read write;

Tablespace altered.

SQL> conn sabau/salim
Connected.
SQL> create table saba(R Number);

Table created.

SQL> Insert Into saba values(1);

1 row created.

SQL> /

1 row created.

SQL> commit;

Commit complete.

SQL> exit;
Disconnected from Oracle Database 10g Enterprise Edition Release 10.2.0.1.0 - Production
With the Partitioning, OLAP and Data Mining options
[oracle@localhost ~]$
---Run Programm successufully.....

Monday, 30 July 2012

DB BUFFER CACHE


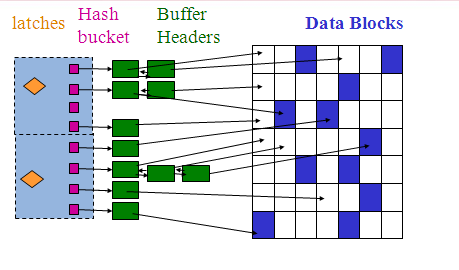
Latches are internal memory structures that coordinate access to shared resources. Locks (also known as enqueues) are different from latches, the key difference being that enqueues, as the name suggests, provide a FIFO queueing mechanism, while latches do not. On the other hand, latches are held very briefly and locks are usually held longer.

In Oracle SGA, the buffer cache is the memory area into which data blocks are read. (If Automatic Shared Memory Management [ASMM] is in use, part of the shared pool can be tagged as KGH:NO ALLOC and remapped to the buffer cache area too.)

Each buffer in the buffer cache has an associated element in the buffer header array, externalized as x$bh. Buffer headers keep track of various attributes and state of buffers in the buffer cache. This buffer header array is allocated in the shared pool. The buffer headers are chained together in a doubly-linked list and linked to a hash bucket. There are many hash buckets, and their number is derived and governed by the _db_block_hash_buckets parameter). Access to these hash chains (both to inspect and change) is protected by cache-buffers-chains latches.

Furthermore, buffer headers can be linked and delinked from hash buckets dynamically.

Here is a simple algorithm to access a buffer (I had to deliberately cut out so as not to deviate too much from our primary discussion):


1. Hash the data block address (DBAs: a combination of tablespace, file_id and block_id) to find hash bucket.
2. Get the latch protecting the hash bucket.
3. If success, 
walk the hash chain (hash bucket), 
reading buffer headers (shared pool) to see if a specific version of the block is already in the chain.
    If found, access the buffer in buffer cache, with protection of buffer pin/unpin actions.


If not found, 
then find a free buffer in buffer cache, 
unlink the buffer header for that buffer from its current chain, 
link that buffer header with this hash chain, 
release the latch and read block in to that free buffer in buffer cache with buffer header pinned.


4. If not success, spin for spin_count times and go to step 2. If that latch was not got with spinning, then sleep (with exponentially increasing sleep time with an upper bound), wakeup, and go to step 2.

Obviously, latches are playing crucial role in controlling access to critical resources such as the hash chain. My point is that repeated access to a few buffers can increase latch activity.

There are many CBC latch children. The parameter _db_block_hash_latches controls the number of latches and is derived from the buffer cache size. Furthermore, in Oracle 10g, shareable latches are used; and inspecting a hash chain necessitates acquiring latches in shared mode, which is compatible with other shared-mode operations. Note that these undocumented parameters are usually sufficient, and changes to these parameters must get approval from Oracle support.


Wednesday, 25 July 2012

Index Rebuild


Check The Delete Leaf/Rows for the purpose of cosume Indexes & query take more time
after that rebuild when index usage more than 20.

* INDEX_STATS
* USER_INDEXES


select 'Analyze Index '||table_owner||'.'||index_name||' Validate Structure ; '
     from user_indexes
        where table_owner='SCOTT' order by index_name;

Select Name,(DEL_LF_ROWS_LEN/LF_ROWS_LEN)*100 as index_usage From index_stats Where LF_ROWS_LEN!=0 order by Name ;


spool c:\temp\indexusage.log
ANALYZE INDEX <index_name> COMPUTE STATISTICS;
Analyze Index scott.<index_name> Validate Structure ;

Select Name,(DEL_LF_ROWS_LEN/LF_ROWS_LEN)*100 as index_usage From index_stats Where LF_ROWS_LEN!=0 order by Name ;
ANALYZE INDEX <index_name> COMPUTE STATISTICS;
Analyze Index scott.<index_name> Validate Structure ;

Select Name,(DEL_LF_ROWS_LEN/LF_ROWS_LEN)*100 as index_usage From index_stats Where LF_ROWS_LEN!=0 order by Name ;
ANALYZE INDEX <index_name> COMPUTE STATISTICS;

Analyze Index scott.<index_name> Validate Structure ;

Select Name,(DEL_LF_ROWS_LEN/LF_ROWS_LEN)*100 as index_usage From index_stats Where LF_ROWS_LEN!=0 order by Name ;
ANALYZE INDEX <index_name> COMPUTE STATISTICS;

Analyze Index scott.<index_name> Validate Structure ;

Select Name,(DEL_LF_ROWS_LEN/LF_ROWS_LEN)*100 as index_usage From index_stats Where LF_ROWS_LEN!=0 order by Name ;
ANALYZE INDEX <index_name> COMPUTE STATISTICS;

Analyze Index scott.<index_name> Validate Structure ;

Select Name,(DEL_LF_ROWS_LEN/LF_ROWS_LEN)*100 as index_usage From index_stats Where LF_ROWS_LEN!=0 order by Name ;
spool off;


alter index scott.<index_name> rebuild ;


alter index scott.<index_name> rebuild online;


ALTER INDEX YYYYY REBUILD TABLESPACE INDX;


Tuesday, 24 July 2012

Windows Server Memory Limits


1) Windows Server 2008 Web

2) Windows Server 2008 Standard
3) Windows Server 2008 Enterprise
4) Windows Server 2008 Datacenter


Windows support for physical memory is dictated by hardware limitations, licensing, operating system data structures, and driver compatibility. The Memory Limits for Windows Releases page in MSDN documents the limits for different Windows versions, and within a version, by SKU.
You can see physical memory support licensing differentiation across the server SKUs for all versions of Windows. For example, the 32-bit version of Windows Server 2008 Standard supports only 4GB, while the 32-bit Windows Server 2008 Datacenter supports 64GB. Likewise, the 64-bit Windows Server 2008 Standard supports 32GB and the 64-bit Windows Server 2008 Datacenter can handle a whopping 2TB. There aren't many 2TB systems out there, but the Windows Server Performance Team knows of a couple, including one they had in their lab at one point. Here's a screenshot of Task Manager running on that system:


The maximum 32-bit limit of 128GB, supported by Windows Server 2003 Datacenter Edition, comes from the fact that structures the Memory Manager uses to track physical memory would consume too much of the system's virtual address space on larger systems. The Memory Manager keeps track of each page of memory in an array called the PFN database and, for performance, it maps the entire PFN database into virtual memory. Because it represents each page of memory with a 28-byte data structure, the PFN database on a 128GB system requires about 980MB. 32-bit Windows has a 4GB virtual address space defined by hardware that it splits by default between the currently executing user-mode process (e.g. Notepad) and the system. 980MB therefore consumes almost half the available 2GB of system virtual address space, leaving only 1GB for mapping the kernel, device drivers, system cache and other system data structures, making that a reasonable cut off:
That's also why the memory limits table lists lower limits for the same SKU's when booted with 4GB tuning (called 4GT and enabled with the Boot.ini's /3GB or /USERVA, and Bcdedit's /Set IncreaseUserVa boot options), because 4GT moves the split to give 3GB to user mode and leave only 1GB for the system. For improved performance, Windows Server 2008 reserves more for system address space by lowering its maximum 32-bit physical memory support to 64GB.
The Memory Manager could accommodate more memory by mapping pieces of the PFN database into the system address as needed, but that would add complexity and possibly reduce performance with the added overhead of map and unmap operations. It's only recently that systems have become large enough for that to be considered, but because the system address space is not a constraint for mapping the entire PFN database on 64-bit Windows, support for more memory is left to 64-bit Windows.
The maximum 2TB limit of 64-bit Windows Server 2008 Datacenter doesn't come from any implementation or hardware limitation, but Microsoft will only support configurations they can test. As of the release of Windows Server 2008, the largest system available anywhere was 2TB and so Windows caps its use of physical memory there.


Configuration of FTP Server in LINUX 5.3

Ftp server is designed for uploading and downloading the files, when ftp server users log's in, they get their home folder at client side and if public/anonymous user log's in they get data stored in /var/ftp folder Steps to

Configure FTP Server in LINUX

Step:--1. Check and install required Packages

Check the packages are installed or not by rpm/yum command 
[root@server ~]# rpm -q vsftpd


Remove the packages and old data if required 
[root@server ~]# yum remove vsftpd* -y

Install the Packages

 Note: Here my file is at Desktop. So i was changing the path to Desktop.

[root@server ~]# cd /root/Desktop/
[root@server Desktop]# ls
FileZilla3 tomcat vsftpd-2.0.5-10.el5.i386.rpm

[root@server Desktop]# chmod 777 vsftpd-2.0.5-10.el5.i386.rpm

[root@server Desktop]# rpm -ivh vsftpd-2.0.5-10.el5.i386.rpm
warning: vsftpd-2.0.5-10.el5.i386.rpm:
Header V3 DSA signature: NOKEY, key ID 37017186
Preparing... ########################################### [100%]
1:vsftpd ########################################### [100%]

Step:--2. Create the resources on ftp server (file/folder & Users)


Create users and assign passwords to whom you want to allow logging through ftp


[root@server ~]# useradd vinay
[root@server ~]# useradd test

[root@server ~]# passwd test
Changing password for user test.
New UNIX password:
BAD PASSWORD:
it is too simplistic/systematic
Retype new UNIX password:
passwd: all authentication tokens updated successfully.


[root@server ~]# passwd vinay
Changing password for user vinay.
New UNIX password:
BAD PASSWORD:
it is too simplistic/systematic
 Retype new UNIX password:
passwd: all authentication tokens updated successfully.


Create or Copy some files inside /var/ftp/pub folder


[root@server ~]# cd /var/ftp/pub/ 
[root@server pub]# touch abc.txt cde.txt audio.mp3 vedio.avi
[root@server pub]# ls 
abc.txt cde.txt audio.mp3 vedio.avi


Create a Upload folder for anonymous users and give full permission for read/write.


For example 
oracle helps
[root@server pub]# mkdir /var/ftp/oracle helps 
[root@server pub]# chmod 777 /var/ftp/oracle helps
[root@server pub]#


Step:--3. Edit the Main Configuration file /etc/vsftpd/vsftpd.conf


[root@server ~]# vi /etc/vsftpd/vsftpd.conf
# FTP EXAMPLES
12 anonymous_enable=YES
15 local_enable=YES
27 anon_upload_enable=YES
83 ftpd_banner=Welcome to oracle helps
:wq!


Step:-- 4. To block the ftp server users (for Ex:-- test) write the user name in file

/etc/vsftpd/ftpusers


[root@server ~]# vi /etc/vsftpd/ftpusers

# Users that are not allowed to login via ftp
test
:wq!

Step:--5. start th ftp service


[root@server ~]# vi /etc/vsftpd/ftpusers
[root@server ~]# service vsftpd restart
Shutting down vsftpd: [FAILED]
Starting vsftpd for vsftpd: [ OK ]

[root@server ~]# service vsftpd restart
Shutting down vsftpd: [ OK ]
Starting vsftpd for vsftpd: [ OK ]

Note: Your system Firewall should be turnoff or In firewall settings ftp exception should be added.


For Checking your ftp in Client Machine, Do the following steps:


1.Open the Web Browser and give following

URL ftp://192.168.xxx.xxx/

Here replace your ftp server IP address.

To upload or Any changes use any Ftp Software like Winscp or Filzilla , etc....


Optional
User Prompting userid & password on FTP


Monitoring Table Usage & Statistics Collections


### Monitoring Table Usage for the apllication & testing purpose when the anyone table not use delete now.. how ...?see
the Scenario's rename the table and see the application break the connection & users face some problem or not when not so drop unused table.

-show parameter '%AUDIT%'
-alter system set audit_trail=db scope=spfile;
-bounce back your database;

-audit select, insert, update, delete, on scott.emp;

-perform DML on EMP table


-select username,obj_name,to_char(timestamp,'dd-mon-yy hh12:mi') event_time,
substr(ses_actions,4,1) del,
substr(ses_actions,7,1) ins,
substr(ses_actions,10,1) sel,
substr(ses_actions,11,1) upd
from dba_audit_object order by 1

-noaudit select, insert, update, delete, on scott.emp;

## Tracking objects Modifications Statistics

----Perform a quick analyze to load in base statistics
DBMS_STATS.GATHER_SCHEMA_STATS ('SCOTT', CASCADE => TRUE);


----Examine the current statistics
SELECT table_name, num_rows, blocks, avg_row_len,monitoring
FROM user_tables
WHERE table_name='EMP';

------Turn on Automatic Monitoring
Now turn on automatic monitoring for the emp table. This can be done using the alter table method.
Starting with Oracle 9i, you can also perform this at the "schema", and "entire database" level. I provide the syntax for all three methods below.
Monitor only the EMP table.

alter table emp monitoring;

-----Monitor all of the tables within Scott's schema. (Oracle 9i and higher)
BEGIN
  DBMS_STATS.alter_schema_tab_monitoring('scott', true);
END;

------Verify that monitoring is turned on.
Note: The results of the following query are from running the alter table ... statement on the emp table only.

SELECT table_name, monitoring
FROM user_tables
ORDER BY monitoring;


----- Delete some rows from the database.

SQL> DELETE FROM emp WHERE rownum < 501;

500 rows deleted.

SQL> commit;

-------Wait until the monitered data is flushed.
before analyze flush first the monitoring information for the statistics collection.
Data can be flushed in several ways.
In Oracle 8i, you can wait it out for 3 hours.
In Oracle 9i and higher, you only need to wait 15 minutes.
In either version, restart the database.
For immediate results in Oracle 9i and higher, use the DBMS_STATS.flush_database_monitoring_info package.
OK, I'm impatient...

exec dbms_stats.flush_database_monitoring_info;

-----Check for what it has collected.
As user "scott", check USER_TAB_MODIFICATIONS to see what it was collected.

SELECT * FROM user_tab_modifications;

------Perform a quick analyze to load in base statistics
DBMS_STATS.GATHER_SCHEMA_STATS ('SCOTT', CASCADE => TRUE);


------Verify that the table is no longer listed in USER_TAB_MODIFICATIONS.
SQL> SELECT * FROM user_tab_modifications;


-----Examine some of new statistics collected.
SELECT table_name, num_rows, blocks, avg_row_len,monitoring
FROM user_tables where table_name='EMP';

Row Spaning multiple blocks (Row chaning & Migration)


SELECT 'TASK_NAME     :'||f.TASK_NAME||chr(10)||
'start run time       :'||to_char(execution_start,'dd-mon-yy hh12:mi')||chr(10)||
'SEGMENT NAME         :'||o.ATTR2 ||chr(10)||
'SEGMENT TYPE         :'||o.TYPE ||chr(10)||
'PARTITION NAME       :'||o.ATTR3 ||chr(10)||
'MESSAGE              :'||f.MESSAGE||chr(10)||
'MORE INFO            :'||f.More_INFO||chr(10)||
'----------------------------------------------'Advice
FROM dba_advisor_findings f,dba_advisor_objects o,
DBA_ADVISOR_LOG l
WHERE o.TASK_ID=f.TASK_ID
AND o.OBJECT_ID=f.OBJECT_ID
and f.task_id=l.task_id
and l.execution_start > sysdate - 1
and o.type in ('TABLE','INDEX')
order by f.task_name
/


## Move the table
alter table clientscannedimage move; //move on segemnt
select owner,index_name,status from dba_indexes where table_name='CLIENTSCANNEDIMAGE'
alter index <index_name> rebuild>;

## If the move setting is low space then use it
select table_name,pct_free from user_tables order by 1
alter table clientscannedimage move pctfree 40;

## Detect & Analyze row chaining
-utlchain.sql //create table this script
--analyze table clientscannedimage list chained rows;
---select count(*) from chained_rows where table_name='CLIENTSCANNEDIMAGE'

----analyze table ldbo.clientscannedimage compute statistics;
-----select CHAIN_CNT from user_tables where table_name='CLIENTSCANNEDIMAGE'

Solution--------
create table temp_scannedimage
as select * from clientscannedimage
where rowid(select head_rowid from chained_rows where table_name='CLIENTSCANNEDIMAGE');

delete from emp
where rowid in (select head_rowid from chained_rows where table_name='CLIENTSCANNEDIMAGE');

insert into clientscannedimage select * from temp_scannedimage

Automated Segment Advisor Advice


Run This Query then after check the output and take the action of the object--

Detect (Row spaning multiple blocks i.e row chaining ,Reclaiming space) with advice

-----Through Package

DESC DBMS_SPACE

SELECT
'SEGMENT ADVICE--------------------------------------------------'  ||chr(10)||
'SEGMENT OWNER         : '||            SEGMENT_OWNER                  ||chr(10)||
'SEGMENT NAME            : '||            SEGMENT_NAME                     ||chr(10)||
'SEGMENT TYPE              : '||            SEGMENT_TYPE                       ||chr(10)||
'TABLESPACE NAME      : '||            TABLESPACE_NAME               ||chr(10)||
'ALLOCATED SPACE       : '||            ALLOCATED_SPACE               ||chr(10)||
'RECLAIMABLE SPACE   : '||            RECLAIMABLE_SPACE           ||chr(10)||
'RECOMMENDATIONS   : '||            RECOMMENDATIONS             ||chr(10)||
'SOLUTION 1                    : '||            C1                                                ||chr(10)||
'SOLUTION 2                    : '||            C2                                                ||chr(10)||
'SOLUTION 3                    : '||            C3 ADVICE
FROM table(dbms_space.asa_recommendations('FALSE','FALSE','FALSE'))
/

Reclaimed space more than 20 MB


---Through Data Dictionary (3 Views)


SELECT * FROM DBA_ADVISOR_EXECUTIONS //11g
OR
SELECT * FROM DBA_ADVISOR_LOG // 10g

SELECT * FROM DBA_ADVISOR_FINDINGS
SELECT * FROM DBA_ADVISOR_OBJECTS


SELECT 'TASK_NAME     :'||f.TASK_NAME                                           ||chr(10)||
'start run time                        :'||to_char(execution_start,'dd-mon-yy hh12:mi')||chr(10)||
'SEGMENT NAME             :'||o.ATTR2                                                      ||chr(10)||
'SEGMENT TYPE               :'||o.TYPE                                                        ||chr(10)||
'PARTITION NAME           :'||o.ATTR3                                                     ||chr(10)||
'MESSAGE                          :'||f.MESSAGE                                                ||chr(10)||
'MORE INFO                      :'||f.More_INFO                                              ||chr(10)||
'----------------------------------------------'Advice
FROM dba_advisor_findings f,dba_advisor_objects o,
DBA_ADVISOR_LOG l
WHERE o.TASK_ID=f.TASK_ID
AND o.OBJECT_ID=f.OBJECT_ID
and f.task_id=l.task_id
and l.execution_start > sysdate - 1
and o.type in ('TABLE','INDEX')
order by f.task_name
/


## Re-organize object:


Shrink Space


alter table <table_name> enable row movement;

Note:- Mannualy,Recommend to use shrink space because after that shrink table reset the HWM they have to work of defragmentation 'i.e' requried row movement 
alter table <table_name> shrink space; //only table segment
alter table <table_name> shrink_space cascade; //table & index sgement


Shrink Space Compact
Note:- No Re-commend not defragmentation  Recover space, but don't amend the high water mark (HWM)
alter table <table_name> shrink space compact;


De-allocate Unused Space

It's Explicitly ,Deallocates unused space beginning from the end of the objects (allocated space) and moving downwards
toward the beginning of the object, continuing down until it reaches the high water mark (HWM).For indexes, "deallocate unused space"
coalesces all leaf blocks within same branch of b-tree, and quickly frees up index leaf blocks for use.

deallocate - simply deallocates unused space at the end of the segment; doesn't move any data


alter table <.......> deallocate unused space;
alter index <......> deallocate unused space;


Shrink Space Restriction
· You cannot specify this clause for a cluster, a clustered table, or any object with a LONG column.
· Segment shrink is not supported for tables with function-based indexes or bitmap join indexes. 

· This clause does not shrink mapping tables of index-organized tables, even if you specify CASCADE.
· You cannot specify this clause for a compressed table.
· You cannot shrink a table that is the master table of an ON COMMIT materialized view. Rowid materialized views must be rebuilt after the shrink operation.
· Segment shrink is not supported for tables with Domain indexes.